


How to Soften Edges of a Photo using Marquee Tool - Adobe Photoshop
- Archivist

- Jul 16, 2021
- 3 min read
Updated: Apr 27, 2022
I want to soften the edges of my photo. How do I do that?

For alternatives like using Eraser Tool or other means, browse our blogs for more help and tips.
STEP 1: Marquee Tool
Click the Marquee Tool located on the upper left of your tools. You can also use the shortcut key (M) on your keyboard.

Step 2: Create a shape
Now the Marquee Tool has other shapes, can be elliptical or rectangle. Choose whichever you prefer for your work. In this case, we will use a rectangle.
Once you've made the rectangle, it will appear like this.

Step 3: Create a Layer

Make sure you have a layer (don't mind the name, it's called Layer 2 in my part lol) set for what we are about to do next. Otherwise you might hit an error.
You can see the + sign below. If you click it, it is to "Create a New Layer".
Step 4: Select Feather
Right click anywhere inside the Selected area and you will see the following options. Click on Feather... to assign how soft the edges you want for your work.

You will see Feather Selection next.

I commonly use 15 up to 30, depending on how soft I want the edges to be. In this case, let's go for 15 to give it a try.
You will then see the changes has been made.

Your rectangular selection itself will now have soft corners. But we don't see the rest of it just yet. Which now leads us to the next step.
Step 5: Paint Bucket Tool
Click the Paint Bucket Tool. Pick any color you want, preferably not white or you won't see it. And then click anywhere inside of the Marquee Tool to see the changes we've made.

I picked color blue so we can see clearly what happened. You will see now that my edges are so soft! It's not rough or solid. Make sure that you also click "Layer 2" from Step 3 to assign the color inside Layer 2. It's okay to do it in the Background layer but in the future, you might want to be careful with the layers.

Step 6: Add the Image in our workspace
I dragged my file to my workspace so now we have Layer 2 and the layer for this image. Let's give them names.
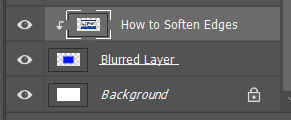
Layer 2 where our soft edges are applied will be called "Blurred Layer"
Our chosen image will be "How to Soften Edges".
Position your chosen image (How to Soften Edges) over Layer 2 (Blurred Layer).

Once you do, go now to your Layers Panel to do the following;
Make sure "How to Soften Edges" is on top of the Blurred Layer.
- Select How to Soften Edges so that it is selected/highlighted.
- Then hold Alt key on your keyboard and hover your mouse on the Blurred Layer. I couldn't do a screenshot for this one but the mouse button will show an arrow cursor pointing to the Blurred Layer,
- left click the Blurred Layer. And you will see the correct result below.
Once that is done, you will see in your workspace the results.

It is a little bad but you have the power to adjust both the Blurred Layer and How to Soften Edges layer. Just make sure to click the layer whose size you want to change and you are in Move Tool before you click Ctrl + T to resize either layers accordingly (and make it fit).
Now that you've adjusted the size it is now finished!
Step 7: (Optional) REDO
In cases that you want to adjust or change the Feather or the soft edges of your Blurred Layer. You might have to redo it all over again from Step 1 and just change the feather radius to come up with the exact soft edges you want.

There could be other ways this is done but this is one of the ways I use for this.
I hope it was able to help you!


awesome!